As Miranda promised last week in "3D printing adventures of Ficinus" I'm going to begin posting my findings from my first few dates, with the Replicator! I first met her in the back room at Clutter in mid-November. I had heard about 3D printers before, but never did they look so fine to the eyes. Maybe that's because I knew she would let me push her buttons…But seriously, ever since that moment I had been dying to try my first print. The long awaited moment finally came when I returned to work January 6th. I wrote all my finding in my fresh 2014 journal. Here are my (edited) notes:
Starship Clutterprise Captains Log Monday Jan 6th 2014
Documenting my First Run Experience (FRE) with the MakerBot Replicator Dual 3D Printer.
What they don't cover in the FRE video on the Makerbot site, is the moment you plug in the power cord to the back of the machine, upside down. This results in a spark and pop, followed by a moment of -did I just break it- terror. Benny (my Swedish friend) and I, watched in horror as the lights on the machine wouldn't go on. Luckily he is an electrician and isolated the issue. With the plug in right side up and the lights on, we began the start-up scripts. The start up scripts are basically instructions on the machines little screen for you to follow.
Leveling the Build Plate:
The machine tells you how to level the build plate for your first print. The build plate is where the object is printed onto, so it needs to be level or the print could be a disaster. We did notice that one of the Extruder heads (where the plastic comes out) was a little off, there are two on this model, one for each color. We might need to adjust those later, but only after the first test.
Extruding Plastic:
Most 3D printers use ABS (Acrylonitrile butadiene styreneplastic), the same that LEGO's are made of….LEGOS!!!! It is around 20$ a pound, and smells when you print. It comes in big coils and is fed into a heated nozzle by a set of gears, (like a tiny automated hot glue gun). The machine asks you to essentially "force-feed" the plastic into it at first to get it started. The left nozzle got jammed and so I had to push harder "Push!…PUSH!"

The First Print!
There is magical place called the Thingiverse, where you can download and upload 3D model files to share for free. We chose a Hollow Pyramid for the first print. I downloaded the ReplicatorG program to make love with our printer. It takes the .stl files downloaded from Thingiverse and turns them into Gcode for the printer.
So basically it takes "things" and puts them into the printers "Gcode" ;D

Here's the very first thing I printed. It jammed half way up the base and so I had to force-feed the plastic into the nozzle again, but after that, it was fine. The first pyramid took 40 minutes because of the jam, while the second took only 30 minutes. The third failed totally after the first few layers because the ABS plastic filament got wrapped around the mount on the back of the machine, like string around a toy car wheel. Easy fix, just had to take off the spool and wrap it up more tightly.
Stay tuned for more Starship Clutterprise Logs! Next time I'm going to review PRINTING IN TWO COLORS AT ONCE!!! *no way..he's crazy!*
For more pictures of the prints check me out on instagram #ficinusdesigns
Categories:
Similar posts
-
 Thursday, March 17, 2016 - 5:35pmHow CUTE is this ice cream toy and why hasn't this been produced yet? It's called Jr Scoop and it's the product of Brutherford Industries and
 -
 Tuesday, February 2, 2016 - 2:54pmWhat is this? A city for ants? Actually, it's a new Kickstarter project which recreates NYC on a 1:5000 scale using microscape's own "aerial scan data".
 -
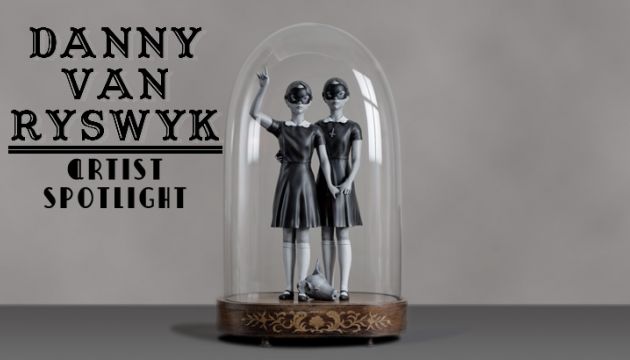 Friday, January 29, 2016 - 4:07pmTwin girls, one wearing an inverted cross while the other curls her fingers into the sign of the horns, a decapitated pig head at their feet.
 Clutter is a FREE monthly print publication covering all things Designer Toy and Sub-Culture art. Founded in 2004 in the good old United Kingdom, Clutter moved to NYC in 2009 where it continues to grow.